RSS

Daily Archives: September 7, 2011

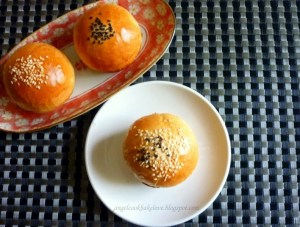
Butter Cup Bread

Butter Cup Bread 奶油面包杯

Ingredients:
250g bread flour
50g plain four
¼ tsp salt
1 ¼ tsp instant yeast
180ml cold water
2 tbsp milk powder
20g butter (soften at room temperature)
Glazing: 1 tbsp whole egg (lightly beaten)
Topping: some black and white sesame
Fillings: 12 small cubes cold butter and some icing sugar

Method:
1) Mix all dry ingredients in a mixing bowl. Make a well in the centre, pour the cold water in the well. Mix the ingredients to form soft dough.
2) Turn out the dough onto a lightly floured work surface. Knead and mix in the butter into the dough. Continue to knead until the dough becomes smooth, elastic and non-sticky.
3) Form the dough into round ball, place it into a lightly greased big mixing bowl and cover with cling wrap, let it rise in room temperature till double in size (about 1 hour in our weather).
4) Punch out the gas in the dough, let it rest for 15 mins.
5) Divide the dough into 12 equal portions, roll into round ball, wrap each dough with one small cube of butter coated with icing sugar, pinch the dough to seal the seam tightly.

6) Place the dough (seam side down) in a greased 12-hole muffin tray. Cover with cling wrap and let it proof for 40-60 mins (size of the dough after second proofing as shown in picture below).

7) Apply egg wash and sprinkle sesames on top.
8) Bake in preheated oven at 180C for about 12 mins. Remove bread from pan immediately and cool on wire rack.

http://angelcookbakelove.blogspot.com/2010/11/butter-cup-bread.html

 
Leave a comment

Posted by on September 7, 2011 in Bread


Tags: ,

Japanese-Style Sweet Bun Dough 湯種甜麵糰

Recipe from the Corner Cafe.


The soft and fluffy texture of the water-roux bun.

In 2004, a Chinese cookbook called ‘65°C湯種麵包’ was published and it soon became very popular with the Chinese bloggers. The book introduced to the Chinese baking community a new way of making soft breads and filled buns using a 65°C water-roux paste. Since then, all sorts of recipes using this method have been popping up all over the Chinese websites.
The innovation of this technique of making bread is the inclusion of a ‘water-roux (湯種 Tang Zhong)’, that is cooking portion of the flour and water first (as opposed to cooking flour and butter for a proper roux in the traditional sense) before adding it to the rest of the ingredients. The water-roux is supposed to allow the dough to absorb more liquid due to the gelatinization of the starch in the flour, thereby allowing the finished buns to have a fine soft texture and not get stale as quickly.
Any Asian-style buns made with the more traditional Sweet Bun Dough can be made using this water-roux method, thereby cutting out the need to add any artificial bread softener or improver.
The following is the basic recipe using the 65°C water-roux paste for sweet bun dough (湯種甜麵糰) to go with sweet filling. At the end of the recipe, I have also included another variation for savoury roll dough (湯種調理麵糰) to go with savoury filling, the method of preparation is the same.


Pork Floss Buns and Coconut Cream Buns made with water-roux sweet bun dough.

Japanese-Style Sweet Bun Dough 湯種甜麵糰

Makes 16 buns

[Ingredients]
375g bread flour
100g plain flour
35g milk powder
75g caster sugar
3/4 teaspoon salt
1 sachet (7g or 2 1/2 tsp) instant dry yeast
1 egg, lightly beaten
150ml (approx.) lukewarm water, adjust as necessary
40g butter, cubed

Water-Roux Paste (湯種) *:
25g (just under 2 tbsp) bread flour
125ml (1/2 cup) water

* Water-Roux is basically 1 part bread flour to 5 parts water.
http://cornercafe.wordpress.com/
[Preparation]
Water-Roux (湯種):
Mix flour and water in a small saucepan. Cook over low to medium heat, stirring continuously until it reaches 65ºC. It should have thickened to a paste at this stage, that is when you stir you can see the bottom of the pan. Remove from heat, place a cling film over the paste and leave until lukewarm, or room temperature, before using. (Alternatively if you don’t have a thermometer, cook as before until it starts to thicken, then continue to cook for about 1 more minute before removing from heat.) This water roux can be kept in an airtight container after cooling in the refrigerator for 1 day if not used immediately. However DO NOT USE if it turns grey in colour, that means it has gone bad.


Water-roux paste.

For the Bun Dough:
1. Sift bread flour, plain flour, milk powder, caster sugar and salt onto the working surface. Add instant dry yeast and mix well. Form the flour mixture into a well. Add lightly beaten egg and lukewarm water roux and mix in. Gradually add just enough lukewarm water to form into a slightly sticky, soft dough. Knead for 10 minutes until smooth and elastic. During hand kneading, the dough also needs to be thrown onto the working surface once every few minutes between kneading to improve the dough structure. (I usually just pick up the dough to about head-high and throw it down onto the working surface 10 to 20 times every few minutes between kneading.)
2. Knead in butter until incorporated. (In many cookbooks, they mentioned that the dough at this stage should be able to be pulled and stretched into membrane, but it’s hard to achieve with hand kneading. I usually stop kneading when the dough sticks to the work surface and stretches like chewing gum when pulled!) Form the dough into a round ball and let it rise until double in size in a large greased bowl, cover with cling film (should take about 1 hour in warm weather, longer in winter months). Optimum room temperature for this first prove is 28°C with a humidity of 75%. To test if the dough has risen properly, dip a finger into bread or plain flour and poke down into the centre of the dough as far as your finger will go and pull out again – the hole should remain if it is ready. If the dough springs back, then it is not ready, continue to prove further.
3. Punch down, knead briefly and form into a ball shape. Then divide into 16 equal portions. The easiest way is to first divide equally into 4 larger portions first, then divide each of these again into quarters each. Form each into balls and let rest for 10 minutes.


Plain water-roux buns before final proving..

4. Shape and fill the buns according to recipe. Place all finished buns on a greased baking sheet, lightly cover with cling film, and let rise until double in size (about 1 hour in warm weather, longer in winter months). Optimum room temperature for this final prove is 38°C with a humidity of 85%.
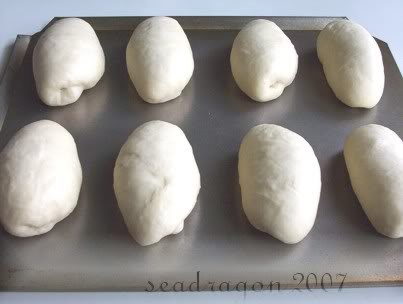

Plain water-roux buns after final proving (double in size).

5. Bake in preheated 190°C oven for about 12 to 15 minutes, or until golden brown.


Plain water-roux buns after baking.

[Variations]
This is a variation of the above recipe for use with savoury filling, the preparation is the same as above:


Savoury buns such as Hotdog Buns and Ham Buns made with water-roux bun dough.

Japanese-Style Savoury Roll Dough 湯種調理麵糰

Makes 16 buns

[Ingredients]
325g bread flour
150g plain flour
20g milk powder
50g caster sugar
1 teaspoon salt
1 sachet (7g or 2 1/2 tsp) instant dry yeast
2 eggs, lightly beaten
100ml (approx.) lukewarm water, adjust as necessary
75g butter, cubed

Water-Roux Paste (湯種) *:
25g (just under 2 tbsp) bread flour
125ml (1/2 cup) water


The texture of the Pai Pau made with water-roux bun dough.

Japanese-Style Sweet Bun Dough 湯種甜麵糰

 
Leave a comment

Posted by on September 7, 2011 in Bread


Tags: , , , ,

Sweet Sandwich Bread (Overnight Sponge Dough Method) 隔夜中种甜三文治面包

食 谱可以做两条土司但我只有一个土司盒(有机会一定要败多一个),所以另一份面团我用9”x5”的loaf pan来烤。因为不带盖烘烤的温度不同,所以两条土司不能一起进烤箱。带盖的土司要烤35分钟,也就是说不带盖的面团要发酵多35分钟,我担心会发酵过 度,所以在烤带盖土司时我把不带盖的面团收入冰箱里。我想低温可以延缓发酵才这么做,不知道这样做到底对不对,还请各位姐妹高手们赐教。

面 包组织带盖的比较紧密,不带盖的比较蓬松,两个都一样软。味道很香(用的牛油比一般土司多吧),带甜,就像在吃甜面包,不需涂牛油果酱也已经很好吃了。作 为三文治面包它几乎有点喧宾夺主,不甘只做配角。面包没有添加剂但室温收藏到第4天还是像出炉时般柔软,这个食谱无疑的值得收藏。下次做我会减糖,让它回 归纯朴!


Those who like sweet and soft bread will like this. I think the dough is also suitable for making sweet buns. The bread remained soft on the forth day in room temperature without any sour aftertaste. This recipe is definitely a keeper for me.

Recipe adapted from Alex Goh’s “Baking Code”《烘培蜜码》. Makes 2 loaves.

Sweet Sandwich Bread (Overnight Sponge Dough Method)

Overnight Sponge
Ingredients:
100g bread flour
60g water, room temp
¼ tsp instant yeast

Method:
1) Mix the instant yeast with 20g of water until well blended. Add in the remaining ingredients and knead to form dough.
2) Let it proof for 30min. Wrap with cling film and keep in the refrigerator overnight or up to 48hours.

Main Dough
Ingredients:
(A)
550g bread flour
80g sugar
6g salt
20g milk powder
10g instant yeast
(B)
150g overnight sponge (all the above)
(C)
1 cold egg
270g cold water
(D)
75g butter (soften)

Method:
1) Mix A until well blended. Add B, then C, knead to form a dough.
2) Add in D, knead to form a smooth and elastic dough. Cover it with cling film. Allow it to proof for 45 min.
3) Divide the dough into 6 equal portions, mould it round. Allow it to rest for 10min.
4) Roll the dough flat with a floured rolling pin, then roll it up like swiss roll. Allow it to rest for 10min. Repeat the step one more time.
5) Place 3 pieces of the dough into a greased loaf tin (20x 11.5x 11.5cm / 450g pullman tin)(I didn’t grease the tin as mine is non-stick). Let it proof for 50min or until 80% full of the loaf tin. Cover it with the lid.
6) Bake at 200C for 35 minutes. Remove it immediately from the tin when baked.

Note:
1) I baked one loaf with cover and one loaf without cover. Without cover one was baked at 190C.
2) The dough is quite sticky but after first proofing it will become less sticky. In fact, it is quite easy to handle.

http://angelcookbakelove.blogspot.com/2011/06/softsoftsoft-sweet-sandwich-bread.html

 
Leave a comment

Posted by on September 7, 2011 in Bread


Tags: , ,

Pizza Dough #1 ~ Thin & Crispy Pizza Dough by Jamie Oliver 脆薄皮萨饼皮

Jamie Oliver’s pizza dough recipe seen from The Batter Baker blog.

This pizza crust is slightly chewy type and the edge is crispy. I find it more “authentic” than my usual recipe which is more “bread” like. I made 1.5 times of the recipe below, served 6. I didn’t roll it into very thin as I preferred thicker crust.

The topping included a layer of store bought pasta sauce, hotdogs, onions, fresh pineapples and yellow capsicums.

I was quite disappointed with the topping, mainly due to the cheese. I usually use mozzarella and cheddar cheese for pizza topping but when I went to shop for the cheese I saw packages of “Pizza Topping” , I thought this was more convenient to use so I grabbed one pack. However, the “Pizza Topping” didn’t turn out good, it was lack of flavour and though I saw the word mozzarella on the ingredient list I couldn’t really taste or see any mozzarella after baking. I only used half pack of it, that’s why there will be Pizza Dough # 2 in my upcoming post. Next post I will be sharing pizza dough using plain flour and shorter proofing time.

Pizza Dough, by Jamie Oliver

Ingredients: (scaled to make a thin 12″ base)
130ml lukewarm water
½ tsp sugar
1 tsp instant yeast
1 tsp extra virgin olive oil (I used normal olive oil)
200g bread flour
½ tsp sea salt

Method:
1) Sprinkle sugar and yeast over water (can reserve 1-2 tbsp water, only add the reserved water if the dough is too dry). Set aside for about 10 min till frothy.
2) Pour yeast mixture and oil into flour and salt.
3) Knead dough till smooth and springy.
4) Place the ball of dough in a large flour-dusted bowl. Proof for about 30 min till double in size (I proof for about 50 mins).
5) Knock back dough and roll out to a 12″ circle.
6) Place on a greased and floured baking pan or pizza stone.
7) Pile on your favourite toppings, and bake at 220*C for 15-20 min till the crust is brown and the cheese is bubbly.

Note:
I roughly kneaded the ingredients by hand and used my bread machine to continue kneading and proofing.

http://angelcookbakelove.blogspot.com/2011/06/pizza-dough-1-thin-crispy-pizza-dough.html

 
Leave a comment

Posted by on September 7, 2011 in Pizzas


Tags: ,

Pizza Dough #2 ~ Soft & Fluffy Pizza Dough Using 100% Plain Flour 松软皮萨饼皮(100%普通面粉)


This is a quick and “bread like” pizza crust using 100% plain flour and total proofing time needed is only 10 minutes. Plain flour is more common and can be found in most households, so anyone can just make this pizza crust at home anytime.


The crust is indeed soft and fluffy. Though it looks thick you won’t feel very filling after eating. I used canned tuna for the topping this time (hot mayonnaise flavour) together with onion and green chili.

Soft & Fluffy Pizza Dough (100% Plain Flour)
(recipe adapted from Yum Yum magazine April 2011)

Ingredients: (served 3-4)
300g plain flour
6g (2 tsp) instant dry yeast
1 tbsp Italian mixed herbs (I omitted)
190-220ml water
½ tsp salt
2 tbsp olive oil
1 tsp sugar

Method:
1) Put all ingredients into a mixing bowl and mix well (add 190ml of water first and slowly add up to 220ml if the dough is dry). Continue to knead into smooth dough. Cover the dough with a piece of wet towel or cling wrap, rest for 10 mins. Roll out the dough into a square.
2) Prick holes all over the dough and bake in preheated oven at 200C for 12 mins or until lightly brown. Remove from oven.
3) Pile on your favourite toppings and bake at 200C until crust is brown and cheese is bubbly.

Note:
I kneaded the dough by hand. The dough was very sticky at the beginning, I just roughly kneaded for about 5-10 mins and left it to proof. The dough became soft and smooth after 10 mins and it was quite easy to handle.

http://angelcookbakelove.blogspot.com/2011/06/pizza-dough-2-soft-fluffy-pizza-dough.html

 
Leave a comment

Posted by on September 7, 2011 in Pizzas


Tags: ,

Quick & Easy Steamed Paus

Here’s the pau skin recipe:

Ingredients:
180g cake flour
20g corn starch
5g double action baking powder
100ml warm water
4g instant yeast (dry yeast)
18g sunflower seed oil or corn oil
30g-35g sugar

Method:
1. Mix everything together and knead till you get a smooth and pliable dough.
2. Prove or rest dough in a covered and warm place for 50 minutes.
3. Punch air out of dough and divide into 8 equal pieces of about 43g each.
4. Shape the pieces round, cover it with a wet towel and rest them for 5 minutes.
5. Flatten the dough piece and shape it into a round disc about 8 or 9 cm in diameter with the center thicker then the rim.
6. Wrap in 25 -35g of filling and pleat the dough into pau shape. Put the pau on a piece of grease-proof paper and line them in the steamer. Rest the pieces for 15 minutes.
7. Steam on high heat for 15 minutes. Serve them piping hot!!!

http://wlteef.blogspot.com/2011/02/quick-easy-steamed-paus.html

 
Leave a comment

Posted by on September 7, 2011 in Snacks


Tags: , ,

Durian Muffin


Durian Muffin 榴莲松糕


This is definitely for durian lovers only. The muffin is very soft even on the third day. The aroma from the durian is quite dominant, plus the pure durian flesh in the centre, it tastes heavenly!

Ingredients: (yield 12 medium size muffins)
(A)
160g plain flour (I used 180g superfine flour)
120g sugar (I cut down to 100g)
1½ tsp baking powder
Pinch of salt (optional)
(B)
120g butter (melted)
120g milk (I added extra 1tbsp water)
2 eggs (lightly beaten)
1 tsp vanilla extract
(C)
1 cup durian flesh (use a fork to mash the durian flesh)

Method:
1) Preheat oven to 180C, prepare muffin cup or line muffin tray with paper liners.
2) In a large bowl, sift and mix together (A). In another bowl combine and mix (B).
3) Make a well in the centre of (A) and add in (B), stir till just incorporated (use a spatula to fold from bottom to top and use the other hand to turn the mixing bowl at the same time).
4) Add about half of (C), mix till combined (do not over mix). Batter should be a bit runny.
5) Fill up each muffin cup with the batter till 50% full, add 1 tsp of the remaining durian flesh, then top with the batter till 80% full.
6) Bake for about 20 – 25 mins or till a toothpick inserted into the centre of muffin and come out clean. Remove muffin from muffin tray and cool on wire rack.

Note:
My muffins were cooked in 20 mins time but the top crust still looked quite pale, I switched to top fire and baked for another 2 – 3 mins to get golden brown crust.

Recipe reference: http://www.mykitch3n.blogspot.com/2008/08/durian-muffin.html (recipe had been modified)

http://angelcookbakelove.blogspot.com/2009/07/calling-all-durian-lovers-durian-muffin.html

 
Leave a comment

Posted by on September 7, 2011 in Cakes, Muffins


Tags: , ,

Nigella’s Chocolate Chocolate-Chip Muffins 【Nigella的】双重巧克力松糕

The cocoa powder used in this recipe is only 2 tbsp that is equivalent to 10g, 4% of the plain flour amount. If you have made other chocolate muffin or cake before, you may have noticed the cocoa powder ratio in this recipe is very low. I think that is the beauty of this recipe; the not so chocolaty batter is balanced by the generous amount of chocolate chips.

However, if you like your muffin to be super chocolaty, you can always increase the amount of cocoa powder.

Ingredients: (makes 12 muffins)
250g plain flour
2 tsp baking powder
1/2 tsp baking soda
2 tbsp best quality cocoa powder
175g caster sugar (I used 170g)
150g chocolate chips (save 1/4 of the chips for sprinkling)
250ml milk
90ml vegetable oil
1 large egg
1 tsp pure vanilla extract

Method:
1) Preheat the oven to 200 deg C.
2) Put the flour, baking powder, baking soda, cocoa, sugar, and 3/4 of the chocolate chips into a large bowl and mix well.
3) Pour all the liquid ingredients into a measuring jug and mix well.
4) Add the wet ingredients to the dry ingredients and mix together with slow and gentle strokes. Stop stirring once the last traces of flour disappear. Do not over mix. A lumpy batter will ensure the muffins stay moist and fluffy.
5) Spoon the batter into paper muffin cases.
6) Sprinkle the remaining 1/4 chocolate chips on top and bake for 20 minutes or until the muffins are dark, risen and springy.

Note:
I lowered the oven temperature to 180C after 10 mins of baking when I noticed the top started to crack.

http://angelcookbakelove.blogspot.com/2010/07/nigellas-chocolate-chocolate-chip.html

 
Leave a comment

Posted by on September 7, 2011 in Cakes, Muffins


Tags: , , ,

Chiffon Cheesecake 芝士戚风蛋糕

Ingredients:

(A)
60g milk (I used UHT milk)
40g cream cheese
25g butter
(B)
65g flour (sifted)
(C)
4 egg yolks
(D)
4 egg whites
90g sugar (I cut down to 75g)
Pinch of salt
1/8 tsp cream of tartar

Method:
1) Cook (A) over double-boiler until well blended and thickens.
2) Remove from double-boiler. Add (B) and mix until smooth.

3) Add (C) and mix until well combined.
4) Whip the egg whites in (D) until foamy. Add the rest of the (D) ingredients in (D). Whip until stiff. Add it into the cheese mixture from step (3). Fold in by hand (use a rubber spatula) until well incorporated.
5) Pour it into a 9-inch chiffon pan. Do not grease the pan. Bake in preheated oven at 175C for 35 – 40 minutes. Remove it from the oven. Invert the pan and let it cool upside down.

Click here to know more about beating of egg white in step (4).

Notes:
1) I doubled the recipe as my chiffon pan was big and another reason was I wanted to finish the leftover cream cheese from making this cake. (I used all 90g).
2) The recipe does not mention if the cheese mixture in step (1) need to cool down before proceed to step (2) and (3). I didn’t let it cool down. I just placed the cheese mixture over a plate of water while doing step (2) and (3).
3) My cake started to crack after baking for about 20 minutes, I am not sure of the reason (anyone can advise me?) but I lowered the temperature to 160C and continued to bake. I baked for 40 minutes in total.

Tips:
1) Make sure the mixing bowl and utensil you use to beat egg white is free of oil, water or egg yolk. The presence of any would affect the final result.
2) Cream of tartar can be replaced by lemon juices.

(Source of recipe: Alex Goh’s Fantastic Cheesecake 《情迷芝士饼》)

http://angelcookbakelove.blogspot.com/2009/11/chiffon-cheesecake.html

 
Leave a comment

Posted by on September 7, 2011 in Cakes, Cheese Cakes, Chiffon Cakes


Tags: , ,

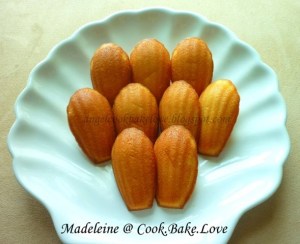
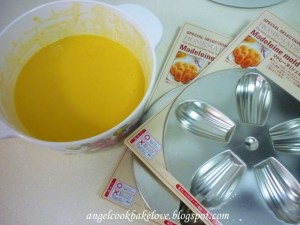
Madeleine 玛德琳


Ingredients:
2 eggs
60g castor sugar
20ml maple syrup (can be replaced by honey)
80g cake flour }
3g baking powder} (I replaced with self-raising flour)
20g ground almond
100g unsalted butter (melted)
½ tsp lemon zest

Method:
1) Beat eggs and sugar till sugar dissolved (need not beat till fluffy).
2) Add maple syrup, mix well and add lemon zest.
3) Sieve in flour mixture and ground almond, mix till just incorporated.
4) Add in melted butter gradually and mix well. Cover with cling wrap and refrigerate for overnight or at least one hour.
5) Grease and flour Madeleine mould, fill with batter till 80% full.
6) Bake in preheated oven at 170C for about 12-15 mins, upper rack.

(Recipe reference: Jane’s Corner)

http://angelcookbakelove.blogspot.com/2011/01/madeleine.html

 
Leave a comment

Posted by on September 7, 2011 in Cakes, Madeleine


Tags: ,